I have been wanting to explore Tekton for a while now and its complexity intimidated me -
I decided to sit down and explore quite a few resources around Tekton and I finally got my first real-world pipeline working. I even wrote a task that is to be published in the Tekton hub. In this blog, I will explain how to get started with Tekton and build a real-world pipeline for a containerized NodeJS application.
Prerequisites
Some prerequisites to set the tone for the audience -
- Experience with containers and Docker
- Fundamental knowledge of Kubernetes such as pods, volumes, secrets, etc.
- Knowledge of YAML
- Knowledge of Bash/Shell script to understand the script that creates the docker credentials secret. Although not necessary due to the comments in the script.
This article is intended for complete beginners in Tekton and to help them get started.
CI/CD Pipeline
Before we start with Tekton, let's understand CI/CD pipelines and why it is used. A CI/CD pipeline is used to automate software delivery. CI stands for Continous Integration, which involves building, testing, and packaging the application for delivery. We will be using Tekton for CI. CD stands for Continous Delivery or Continous Deployment, which involves deploying the application once it is built/packaged. In the Cloud Native ecosystem, ArgoCD and JenkinsX are some of the popular tools for CD.
Tekton terminology
Tekton is a Kubernetes native CI tool and all the instructions (pipeline) are defined as Kubernetes manifests. All Tekton objects are provided as Custom Resource Definitions(CRDs).

Let's understand some Tekton terminology that we will be using going forward in this article.
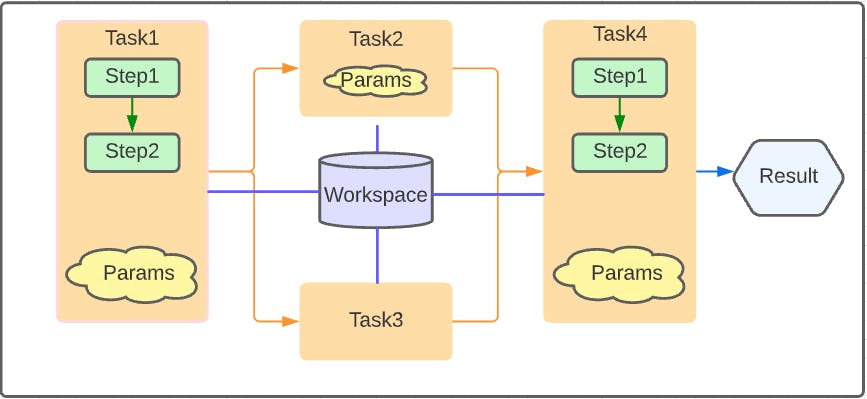
Task - A Task is a collection of steps that you define and arrange in a specific order of execution as part of your continuous integration flow. For example, a task can be to clone a git repository.
Step - A task can have multiple steps. These steps perform a single functionality. For example, a step can be writing to a file and another step can be reading from that file, all happening in a single task.
Pipeline - A pipeline is a series of tasks executed in series or parallel. It constitutes the entire Tekton flow. The above image represents a pipeline in Tekton.
Workspace - A workspace is a common space shared by the tasks in a pipeline. This can be an emptyDir or a ConfigMap or a PVC or a Secret. We will be using PersistantVolumeClaim (PVC) as a workspace in our example.
Result - A result is a value produced by a Task which can then be used as a parameter value to other Tasks.
TaskRun - A TaskRun is a Tekton object used to run tasks individually. Once a task is created in Tekton, you'll either need a TaskRun or a Pipeline to run the task. In a TaskRun, we provide the necessary parameters, workspaces that are required to run the task.
PipelineRun - A PipelineRun is a Tekton object used to run pipelines. It represents a pipeline in execution. This is where the parameters are provided to the pipeline for its execution.
Installation
We will be installing 3 components -
- Tekton resources - Contains all the objects for Tekton CRDs, ConfigMaps, and other components.
kubectl apply --filename https://storage.googleapis.com/tekton-releases/pipeline/latest/release.yaml
- Tekton dashboard - To visualise our pipeline in a GUI
kubectl apply --filename https://storage.googleapis.com/tekton-releases/dashboard/latest/tekton-dashboard-release.yaml
- Tekton CLI - CLI to interact with Tekton and make our life easier
For Linux AMD64,
# Get the tar.xz
curl -LO https://github.com/tektoncd/cli/releases/download/v0.22.0/tkn_0.22.0_Linux_x86_64.tar.gz
# Extract tkn to your PATH (e.g. /usr/local/bin)
sudo tar xvzf tkn_0.22.0_Linux_x86_64.tar.gz -C /usr/local/bin/ tkn
Please refer to Tekton CLI for installing in other operating systems and architectures.
Tasks
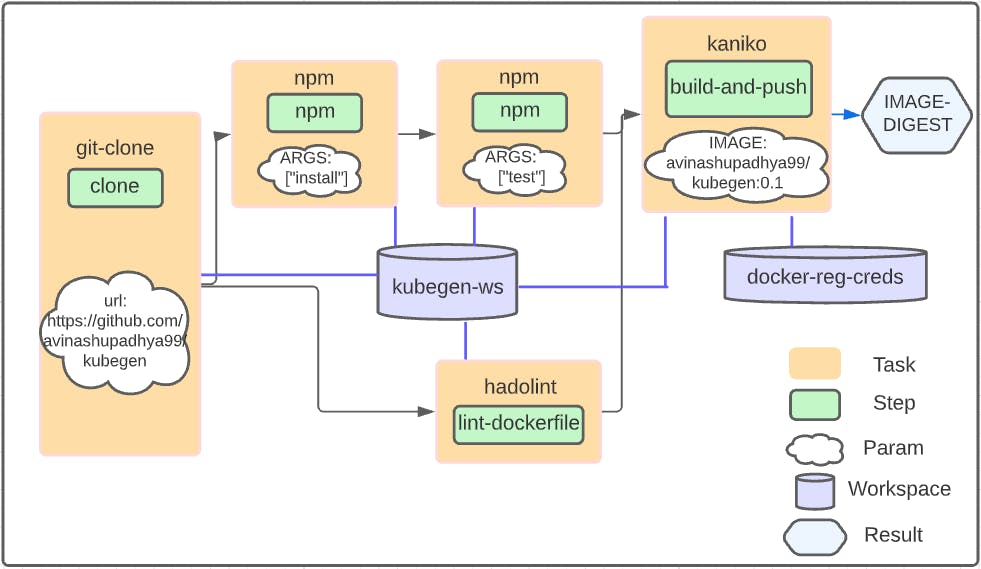
As mentioned earlier, a task contains multiple steps and performs a part of the overall pipeline. Here's what the pipeline we are building will look like -

git-clone - The
git-clonetask clones a repository into a workspace. We will be using a community-built definition for the task and the task is available on Tekton Hub. The task accepts a long list of parameters to operate such as url, revision, verbose, submodules among others but we are interested in one single parameter called url. This specifies the URL of the git repository to clone. We can also provide SSH keys to clone private repositories but to keep things simple, we will be cloning a public repository - github.com/avinashupadhya99/kubegen.Since all tasks are defined as Kubernetes manifests, we can install the
git-clonetask using the publicly available task definition in YAML -
kubectl apply -f https://raw.githubusercontent.com/tektoncd/catalog/main/task/git-clone/0.5/git-clone.yaml
A task can also be installed using the
tknCLI -tkn hub install task git-clone
Tekton Hub - Tekton Hub is a collection of community-built tasks that perform a few standard operations in a CICD pipeline. It is hosted at hub.tekton.dev
- npm - The
npmtask is another task from Tekton Hub that runs npm commands. We will be using this command to run unit tests. Just like thegit-clonetask, the npm task also takes in parameters such as PATH_CONTEXT, ARGS, and IMAGE. We are interested in the ARGS parameter which specifies the arguments for the npm command.
Let us explore the task definition to understand the components -
apiVersion: tekton.dev/v1beta1
kind: Task
metadata:
  name: npm
  labels:
    app.kubernetes.io/version: "0.1"
  annotations:
    tekton.dev/pipelines.minVersion: "0.17.0"
    tekton.dev/categories: Build Tools
    tekton.dev/tags: build-tool
    tekton.dev/platforms: "linux/amd64,linux/s390x,linux/ppc64le"
spec:
  description: >-
    This task can be used to run npm goals on a project.

    This task can be used to run npm goals on a project
    where package.json is present and has some pre-defined
    npm scripts.
  workspaces:
    - name: source
  params:
    - name: PATH_CONTEXT
      type: string
      default: "."
      description: The path where package.json of the project is defined.
    - name: ARGS
      type: array
      default: ["version"]
      description: The npm goals you want to run.
    - name: IMAGE
      type: string
      default: "docker.io/library/node:12-alpine@sha256:dfbebf17bfb014e1e7068e76325a117bccf8679c68aec6a28514184a209c8bae"
      description: The node image you want to use.
  steps:
    - name: npm-run
      image: $(params.IMAGE)
      command:
        - "npm"
      args:
        - $(params.ARGS)
      workingDir: $(workspaces.source.path)/$(params.PATH_CONTEXT)
      env:
        - name: CI
          value: "true"
- apiVersion - Specifies the Tekton API Version to be used. A standard YAML key in Kubernetes manifests.
- kind - Specifies the kind of Kubernetes object,
Taskin this case. The kindTaskis defined as a Kubernetes Custom Resource Definition (CRD) by Tekton. - metadata - Provides metadata for the Kubernetes object. The name key should contain the value for the name of the task, which is used in Pipelines and TaskRuns to refer to the task. The other keys in the metadata are used to provide more information about the task. These are not mandatory but informative.
spec - Spec is another standard Kubernetes YAML key that provides the actual specification of the Kubernetes object, a
Taskin this case.- description - Provides a detailed description of the task. Optional but a good practice.
- workspaces - Specifies the list of all workspaces required by the task. Each value should contain a name key. Optionally, each workspace value can contain a description, readOnly key (boolean specifying if the workspace is read-only), and a mountPath key (path for the workspace mount, absolute or relative). The workspace path can be referred to using
$(workspaces.<workspace-name>.path)where<workspace-name>is the name of the workspace. - params - Specifies the parameters required to be passed to the task. Each param value should contain a name key, which specifies the name of the parameter. Optionally, each param value can contain a description, type and a default value. The type indicates the type of the parameter - string or array. The default value is used when no value is passed for the parameter to the task. We can reference the parameters in our task using
$(params.<parameter-name>), where<parameter-name>is the name of the parameter. steps - Specifies the list of all steps for the task.
- name - Specifies the name of the step and is a mandatory key.
- image - Each step runs as a container and hence requires a container image to be provided.
- workingDir - Used to set the working directory for the container. Any command or script executed as a part of the step will be run in this directory unless changed in the script.
env - Used to set the environment variables for the container. Each env value should contain a name and value key. Confidential environment variables can be set to a value from a Kubernetes secret. Example -
   env:
     - name: ENVIRONMENT_VARIABLE
        valueFrom:
          secretKeyRef:
            name: <SECRET_NAME> # Value generally picked from param
            key: <SECRET_KEY> # Value generally picked from param
command - Specifies the command to be run for achieving the goal of the step. It is a string value with just the command and not the arguments for the command.
- args - Specifies the arguments for the command specified in the command key. It is an array of values with each value containing one argument.
- script - Although the
npmtask does not have a script key, it is an alternative for using the command and args keys. A step should either contain the command and args keys or the script key. The script is usually a shell script executed for achieving the goal of the step. Example -
   script: |
     #!/usr/bin/env sh
     echo "Hello World"
Let us install the npm task from Tekton Hub -
kubectl apply -f https://raw.githubusercontent.com/tektoncd/catalog/main/task/npm/0.1/npm.yaml
- hadolint - The
hadolinttask lints the Dockerfile of the application. We will be using the community-built definition for the task and the task is available on Tekton Hub. The task accepts parameters such as ignore-rules, dockerfile-path and output-format. We will leave all the parameters with the default values since we do not want to ignore any rule or change the output format from tty, which outputs the details to the standard output. Since our Dockerfile is in the expected path i.e, at the workspace path since that is where the repository is cloned.
Let us install the hadolint task using the YAML file -
kubectl apply -f https://raw.githubusercontent.com/tektoncd/catalog/main/task/hadolint/0.1/hadolint.yaml
- kaniko - Kaniko is an open-source project by Google to build container images in Kubernetes. The task definition for kaniko is available on Tekton Hub. The task accepts parameters such as IMAGE, DOCKERFILE, CONTEXT, EXTRA_ARGS, and BUILDER_IMAGE but we will be only providing the IMAGE parameter's value, leaving the rest with the default values. The IMAGE parameter is used to specify the complete image name of the application image to be built along with the tag.
We can install the kaniko task from Tekton Hub using -
kubectl apply -f https://raw.githubusercontent.com/tektoncd/catalog/main/task/kaniko/0.5/kaniko.yaml
Once all the tasks are installed, we can verify(list) all tasks using the tkn CLI -
tkn task list # Or tkn task ls

Supporting Kubernetes Objects
We will need a few standard Kubernetes objects such as Secret and PersistentVolumeClaim for our pipeline. Let us start by creating the Persistent Volume Claim -
apiVersion: v1
kind: PersistentVolumeClaim
metadata:
  name: tekton-pvc
spec:
  accessModes:
    - ReadWriteOnce
  resources:
    requests:
      storage: 2Gi
This creates a Persistent Volume Claim for 2GB and can be used as a workspace for our pipeline. We will see how to attach a PVC to a workspace while creating a PipelineRun.
The kaniko task requires the docker configuration i.e, docker credentials to be provided as a Kubernetes Secret, which is mounted as a workspace to the task. There are two ways to secret the docker configuration Secret - Using the kubernetes.io/dockercfg Secret type or using the kubectl command line and docker-registry as the type. But if we look at the Task definition for kaniko, it expects a config.json and the docker-registry secret creates a .dockerconfigjson file. We will be using the following workaround -
- Create a file
docker-secret.yamlwith the following contents -
apiVersion: v1
kind: Secret
metadata:
  name: docker-creds
type: Opaque
stringData:
  config.json: "{\"auths\":{\"REGISTRY_SERVER\":{\"username\":\"REGISTRY_USER\",\"password\":\"REGISTRY_PASS\",\"email\":\"REGISTRY_EMAIL\",\"auth\":\"REGISTRY_AUTH\"}}}"
Run the following script
# Create bash/shell variables
REGISTRY_SERVER=https://index.docker.io/v1/ # Replace with your registry server
REGISTRY_USER=<DOCKER_HUB_USERNAME> # Replace with your docker hub username or registry username
REGISTRY_PASS=<DOCKER_HUB_PASSWORD> # Note that using passwords in shell is not secure. Replace with your docker hub password or registry password
REGISTRY_EMAIL=<DOCKER_HUB_EMAIL> # Replace with your docker hub email or registry email
REGISTRY_AUTH=$(echo -n "$REGISTRY_USER:$REGISTRY_PASS" | base64)

# Replace the values of the REGISTRY_ placeholders with the actual values of the variables in the docker-secret.yaml file
sed -i "s|REGISTRY_SERVER|$REGISTRY_SERVER|g" docker-secret.yaml
sed -i "s|REGISTRY_USER|$REGISTRY_USER|g" docker-secret.yaml
sed -i "s|REGISTRY_PASS|$REGISTRY_PASS|g" docker-secret.yaml
sed -i "s|REGISTRY_EMAIL|$REGISTRY_EMAIL|g" docker-secret.yaml

# Create the secret
kubectl apply -f docker-secret.yaml
You can use your Docker Hub credentials and set the docker-server as index.docker.io/v1.
Pipeline
In this section, we will stitch the entire workflow of tasks into a pipeline. Our pipeline definition will look as follows -
apiVersion: tekton.dev/v1beta1
kind: Pipeline
metadata:
  name: nodejs-pipeline
spec:
  params:
  - name: git_url
    default: https://github.com/avinashupadhya99/kubegen
    type: string
  - name: imageUrl
    default: avinashupadhya99/kubegen
    type: string
  - name: imageTag
    default: latest
    type: string
  workspaces:
    - name: kubegen-ws
    - name: docker-reg-creds
  tasks:
  - name: git-clone
    taskRef:
      name: git-clone
    workspaces:
    - name: output
      workspace: kubegen-ws
    params:
    - name: url
      value: $(params.git_url)
  - name: install-dependencies
    taskRef:
      name: npm
    workspaces:
    - name: source
      workspace: kubegen-ws
    params:
    - name: ARGS
      value: ["install"]
    runAfter:
    - git-clone
  - name: unit-test
    taskRef:
      name: npm
    workspaces:
    - name: source
      workspace: kubegen-ws
    params:
    - name: ARGS
      value: ["test"]
    runAfter:
    - install-dependencies
  - name: dockerfile-lint
    taskRef:
      name: hadolint
    workspaces:
    - name: source
      workspace: kubegen-ws
    runAfter:
    - git-clone
  - name: build-and-push
    taskRef:
      name: kaniko
    workspaces:
    - name: source
      workspace: kubegen-ws
    - name: dockerconfig
      workspace: docker-reg-creds
    params:
    - name: IMAGE
      value: $(params.imageUrl):$(params.imageTag)
    runAfter:
    - unit-test
    - dockerfile-lint
I will start with going through the keys of the spec field since the others are common with most Kubernetes objects and are covered in the Tasks section of this article.
- params - Specifies the parameters for the pipeline. These are different from the params for a Task. When a pipeline is run using a PipelineRun, values for these parameters are given.
- workspaces - Specifies the list of workspaces used across Tasks in the Pipeline.
- tasks - Tasks that are executed as a part of the Pipeline are listed in this section.
- name - Each Task value contains a name key, which identifies the Task in the Pipeline. It can be different from the name of the Task definition. This value is used to refer to the Task within the pipeline.
- taskRef - Provides a reference to the Task defined. Each taskRef contains a name child key that contains the name of the Task object.
- workspaces - Provides a workspace mapping for each workspace defined in a Task. The name key refers to the name of the workspace defined in the Task definition and the workspace key refers to the actual workspace defined in the Pipeline.
- params - The parameters for the Task are provided values in this section. Each value of the params array contains a name and value key.
- runAfter - Contains an array of Task names and the current Task will be run after the successful execution of the Tasks defined in the array. By default, all Tasks are executed in parallel in Tekton. The runAfter key is used to control the flow of execution of tasks in a Pipeline.
Save the Pipeline definition in a pipeline.yaml file and create the pipeline using -
kubectl apply -f pipeline.yaml
Verify that the pipeline was created using the tkn CLI -
tkn pipeline ls
Running a Pipeline
A Tekton Pipeline can be executed using a PipelineRun. We will use the tkn CLI to create the definition for our PipelineRun -
tkn pipeline start nodejs-pipeline --dry-run
Note the use of the
--dry-runflag. Specifying this flag only returns the PipelineRun YAML definition and does not actually execute the Pipeline. Omitting the flag will run the Pipeline without saving the YAML definition. We will save the YAML definition to reuse it.
The above command will prompt a few questions regarding the parameters and workspaces. We can provide the appropriate values for the git_url, imageUrl and imageTag parameters.
The next set of questions is regarding the workspaces. The name of the workspace will be the name of the workspace that the prompt is regarding. In the first case, it is kubegen-ws. We can leave the sub path field empty since that is not required. Select pvc for the type of workspace. The name of the PVC will be the name of the PVC we created earlier i.e, tekton-pvc. Similarly for the next workspace, the name will be the same name as the workspace i.e., docker-reg-creds. We'll leave the subpath empty. The type of workspace is secret. The name of the secret would be the name of the secret we created earlier i.e., docker-creds. We'll leave the Item Value field empty as well.
The following YAML definition for PipelineRun would be generated. Let us save it in a file called pipelinerun.yaml.
apiVersion: tekton.dev/v1beta1
kind: PipelineRun
metadata:
  creationTimestamp: null
  generateName: nodejs-pipeline-run-
  namespace: default
spec:
  params:
  - name: git_url
    value: https://github.com/avinashupadhya99/kubegen
  - name: imageTag
    value: "0.1"
  - name: imageUrl
    value: avinashupadhya99/kubegen
  pipelineRef:
    name: nodejs-pipeline
  workspaces:
  - name: kubegen-ws
    persistentVolumeClaim:
      claimName: tekton-pvc
  - name: docker-reg-creds
    secret:
      secretName: docker-creds
status: {}
Notice the generateName field, it indicates that each PipelineRun will start with nodejs-pipeline-run- followed by a random string. Since we have just the PipelineRun definition, let's create a PipelineRun -
kubectl create -f pipelinerun.yaml
Let us check the status of our PipelineRun using -
tkn pipelinerun ls # Or tkn pr ls

We can check the logs of the pipeline run while it is running by -
tkn pr logs nodejs-pipeline-run-74zl2 -f
Where nodejs-pipeline-run-74zl2 is the name of the PipelineRun and -f flag indicates following the logs. Once the execution is complete, we can check the logs without the -f flag.
We used a PipelineRun to manually run the pipeline but this is not the scenario in real-world pipelines. A Tekton trigger is used to run pipelines based on a trigger, which can be a push to GitHub repository or similar events.
Visualising the pipeline
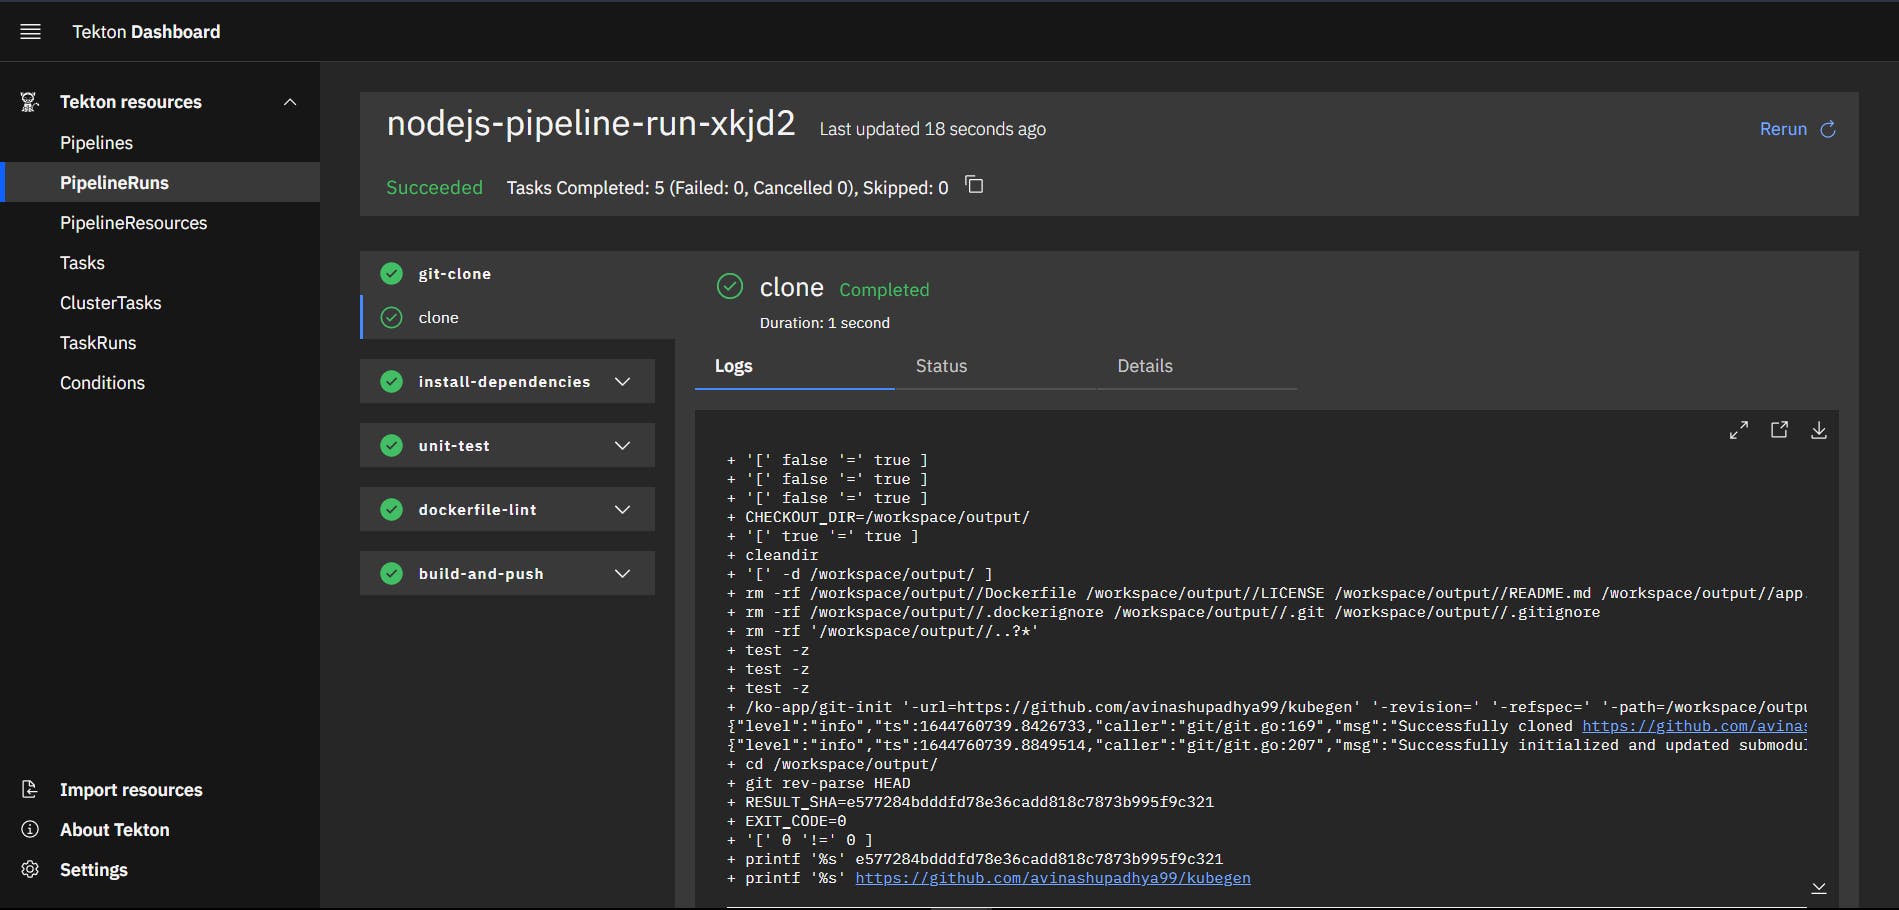
We can visualize the pipeline using the Tekton dashboard we installed earlier. We will use kubectl's port forwarding mechanism to look at the dashboard -
kubectl --namespace tekton-pipelines port-forward svc/tekton-dashboard 9097:9097
The dashboard is now available at localhost:9097
Although the dashboard lacks proper visualization of a pipeline with parallel tasks, it is still a great tool to look at the various Tekton resources in the cluster along with its logs, execution, and definitions.

That's it for this article, folks! Thank you for reading! I have added all the files from the article in github.com/avinashupadhya99/tekton-simplified. Hope you learned something new and please leave a comment with feedback and questions if any! 👋
